Below is our Music Video:


Below are the front panels of our digipak:

Below are the outside panels to our digipak.

Below are the outside panels to our digipak.

Below are the inside panels to our digipak.

Below are the inside panels to our digipak.

Click on the image below to access our website.

Wednesday 15 March 2017

Question 1: In what ways does your media product use, develop or challenge forms and conventions of real media products?

My film, ‘What Happened to Peter Smith’ follows a group of 5 schoolkids: Tyrone, Cherish, Lucy, Simon and Rajesh as they are interviewed by Detective Sean Mann about the disappearance of Peter Smith from Lucy Patterson’s party. Later on in the film we see the characters describe their last interaction with Peter and, unintentionally, their true colours and motives behind the murder of Peter.

 Throughout our opening sequence we took common conventions of the mystery drama genre. We carefully chose which conventions to follow and which we intentionally chose not to stick to. Despite our film being a mystery drama we were also inspired by the conventions of teen drama and crime drama. We referred closely to form and style, genre codes and narrative structure and media theories such as Barthes’ narrative codes.


Below I have analysed the form, genre, narrative structure and style of film openings.


Below I have made a slideshow showing how we used relevant media theories:


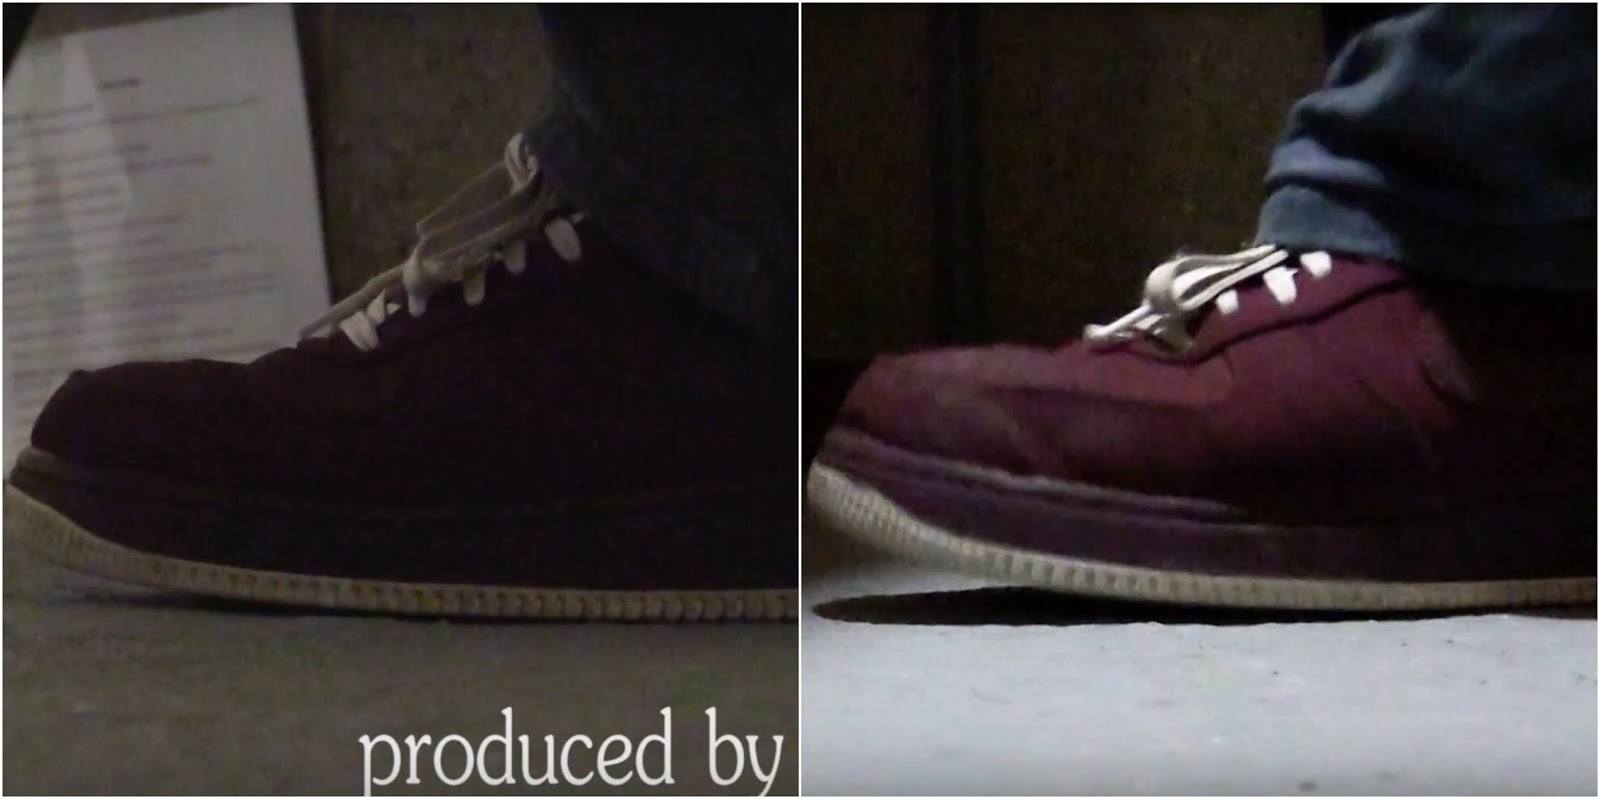
Here are the close ups we used as enigma codes:


Question 2: How does your media product represent particular social groups?

Due to our fairly large ensemble cast it was easier to convey the representation of ethnicity that we had intended. As our story took place in current day London we felt that it was important to have a wide variety of ethnicity and similar to other films that choose to represent ethnicity we thought it was possible to stick to and still subvert some common stereotypes.


Our choice of costume and makeup, dialogue, behavior and the overall demeanor of the characters were very important as it was how we wanted to obviously reflect the various ethnicity. 

Below is an emaze showing how we chose to reflect ethnicity in our opening sequence:


Question 3:What kind of media institution might distribute your media product and why?

The choices within institution are very vital to the production and exhibition of the film, these are arguably the two most important aspects of the film as it is what makes the film a film. The ownership model varies depending on the type of film, our film is a good example of the independent ownership model. We chose Screen Gems as our production company and Film4 as our distributor. These slides will show the decisions we made of institution and the reasoning behind it.


Question 4: Who would be the audience for your media product

The target audience is a decision that needs to be made very early on as the decision influences almost all of the decisions made later on.

I have created a Prezi all about our target audience below, please see it.


Question 5: How did you attract/address your audience

Attracting and addressing the audience is a key part of a film as at the end of the day, people won't watch a film they they don't want to watch. It was very important for us to consider how we were planning to attract and address the audience as we were producing the opening sequence so we needed to make sure we hooked our audience.

The mindmap below shows how we considered the uses and gratification theory and how we related that to aspects of our film.


It is important to get feedback as it is a relatively objective form of evaluation of the video that gives a fair and balanced reflection of how effective the video was.

Here is our feedback video and a feedback text I received:


From this feedback video we were able to learn that the characterization in the video was effective as all of the characters could be remembered, we were also able to learn that our music worked well to convey the genre. They said they "loved the music"


From the feedback on texts again I learned that the characterization was effective and the continuity techniques made the storyline seem very intriguing. 

Both forms of feedback had nothing to say when asked about what we need to work on, although the people giving the feedback may have been very nice as they are our friends but I think it might just reflect how effective our video was.

I agree with the feedback and I feel that the way we introduced the characters was very effective and allowed the audience to remember exactly who the characters, that are central to the plot, are. I also agree that the continuity techniques that we used helped make the sequence appear "really intriguing".

Sian and Meera's needs for entertainment were gratified by the music in the video that they "really liked" also there need for escapism was gratified by the intriguing continuity techniques and camera work which immersed them into the world of the film. 

Question 6: What have you learnt from the process of constructing this project

I feel that over the course of this project I have learned a lot and increased my technological skills. I used some of the software and hardware when I did a project at GCSE but doing this project allowed me to have a much more in depth experience with it. In my opinion my group worked well with the technology we had, it did not hinder us it only helped us.


Hardware

Below is a slideshow showing the hardware that we used:


Below is a slideshow showing my technological learning curve in terms of using hardware:


Software

Below is a slideshow showing the software that we used:


Below is a slideshow showing my technological learning curve in terms of using software:


Question 7: Looking back at your preliminary task, what do you feel you have learnt in the progression form it to the full project?

We were very eager to produce our opening sequence. Doing the preliminary task was very useful as it gave us the basic knowledge we needed on continuity, which was an integral part of our sequence.

 
The preliminary task brief.
 
The production task brief
A Timeline of Our Project:


Our Preliminary Video

Our Animatic

Our Test Video

Our Final Video


This Prezi shows the progression from the prelim task to the main project task, it also shows the differences and similarities of the two projects.

Saturday 4 March 2017

Construction Post 30: Looking back - reflections on our final outcome

I think that this project went really well.

I feel that I have grown more as an individual in regards to media skills and I think we worked very well as a group. The feedback we have received on the video has all been very positive and that is nice considering the effort we all put into it.

Although it may seem unlikely now, this project has prepared me if I ever wanted to make an opening sequence or even a short film. I may be biased but I honestly would love top see the rest of this film as I feel the opening is very strong and effective.

Overall I think the project was a great learning experience, we did face some challenges that we had to overcome but I feel it all worked out for the best.

Construction Post 29: My technical learning curve (production and post-production)

Prior to this project I had had some basic experience but I think that as a result of this project, my skills have improved.

For example:

I have learned about the importance of correct lighting:

Test shoot (left), Main shoot (right)
Here I was able to learn from the test shoot and use an external light to light Raj's foot

How to make titles on Livetype:

Although the software was very simple, the addition of these titles made our video look much more professional.


Multi-track editing:


Although it was not shown when watching just the video, multi-track editing meant that it was easy to work on the video and change things at will.

Construction Post 28: My personal contribution to the Edit Sessions

During post-production I took a large role in editing. During the edit week 2 we had to work on the intricate bits of the edit that would take the edit from an amateur video to a professional looking video.


I enjoyed editing a lot as I liked seeing our shots string together into a coherent video. I liked being precise with all of the cutting and editing.

I also used the Macbook to do the titles on Livetype. A notable contribution I made was choosing the font and style of the titles that we ended up using. Making titles was very good as it meant that one person could be editing on the PC while the other group members were creating titles. I also made the majority of the titles.

One of the finished titles


I am very pleased with the outcome of the video, as I know how long my entire group spent editing the video.

Construction Post 27: My personal contribution to the Shoot Sessions

Prior to the shoot, I assisted Emilio in arranging the set. On the shoot day I helped get the actors ready by reinforcing their character role and motivation, setting up the kit and arranging the props and also clearing some of the things in the background that we realised were in the way in the test shoot.

My role was varied as I was acting, filming and directing. I mostly did filming and directing though as my role in the sequence was not that long.

Me filming one of the first shots in the sequence.


As an actor, I played Tyrone. This was very useful as it meant that we didn’t need to have another actor play the role and there would be a smaller chance of error.

As a crew member, I filmed many of the shots, especially the master shots. I also directed some shots.


Overall I am very pleased with my performance during the main shoot and I feel that I, and the rest of my group, played a vital role in the success of our opening sequence.

Construction Post 26: Reflections on Edit Week 2

In Edit Week 2 we had to do the more intricate bits of editing such as the sound mix, video FX, grading and titles. Again, we used a schedule to keep organised and make sure that as little time was wasted so we could finish the video on time.

Grading

In Adobe Premiere Pro we used the effects to give us greater control on the look of the video, we could change the saturation, brightness, contrast and the colour of the video. As we didn't need any drastic colour changes in our video because the lighting was the same throughout, we mainly used brightness and contrast to achieve the look we wanted.

Sound Mix

As audio was a major part of our video throughout we needed to make sure that we properly adjusted it to be the best it could be. We worked on the transition of the audio between shots to make sure it was smooth as if the whole sequence was one long conversation and also we mad sure the audio was at a set level that meant it never peaked thus making it sound crackly and grainy.

Titles

We used Livetype on the Apple Macbook Pro to create the titles and the effects. The software was very easy to use and it helped that it wasn’t the first time that I had used this software. We could change a number of effects on the titles such as animation speed, duration on screen and colour.

Here I am making titles on Livetype

Edit Week 2 was a huge success and we are pleased with all of the work we managed to get down and the final look of our project.

Construction Post 25: The Back-Up Shoot

We decided to not have a backup shoot as we felt that we got all of the shots that we needed and a backup shot would be unnecessary. We managed to avoid a backup shoot by making sure to not repeat the errors we made in the test shoot and to take many variations of the same shot meaning that when it came to editing we had a variety of shot types to use if we didn’t like the original.

Construction Post 24: Reflections on Edit Week 1

We split the two weeks we had for editing into edit week 1 and edit week 2. Edit week 1 was for getting a rough version of the video produced.

Edit week 1 was very successful. We had many more shots than other groups due to the complexity of our cuts so we had many shots and different takes of shots to rename but after we got through that fairly laborious task, we were able to work very efficiently.

Here Jack and I are editing the sequence and trying to put it into the rough order.


On the Friday of Edit week 1, we had to have a rough cut ready, from this rough cut we were able to see if a back up shoot would be needed but due to our pro-activity when shooting and the large variation of shots that we had it meant that we did not need a back up shoot.

Overall the basic edit we created helped us move forward easily into the more technically challenging aspects of the edit. If we had not split up the edit into two weeks I feel we would have jumbled ourselves as we might have gone onto more technical tasks without knowing exactly how our video would flow and this would have wasted even more time.

Construction Post 23: Our Post-production Kit

Our post-production kit is a Desktop computer with Windows 7, and using 'Adobe Premiere'. These editing PCs were very fast meaning we could quickly render and load our sequence. The software allows for accurate and precise audio and video editing. Adobe Premiere was crucial in creating our sequence, as it allowed us to easily edit without much the need much experience, our method of multi-track editing in premiere also made it easy for us to effectively edit.

Me editing on Premiere Pro
 As you can see in the first screen we used multi track editing setup making it easy to edit individual shots and add effects such as sound bridges.

We also used Livetype on an Apple Macbook Pro to create our titles and the effects that go along with them.

Me making titles on Livetype on the Macbook Pro
The portability of the Macbook Pro meant it was easy to edit the titles whilst still being at the edit suite and working out the placement of the titles.

Construction Post 22: Reflections on our Main Shoot Session

We decided to make a shootboard to plan out the day into when and how we would take every shot. We from the test shoot we learned a lot of things, one of these being stagger out the cast call times to be much more efficient with timing and to reduce the amount of time our cast were waiting and not doing anything.

The day went very well and doing our shots in the morning before any of the other cast members got there meant that we had time to correct mistakes and try a variety of shot types that meant we could try and avoid the need for a backup shoot.

From what we learned from our test shoot we realised there were things to change and add in order to make the best video possible, such as:
  • We swapped around the actors who played Cherish and Lucy, as we thought that they would be better suited acting a different role. The actors worked a lot better in their new roles in the main shoot because we also gave the script before the shoot so they could become familiar with their new lines.
  • We also added some new shots for Cherish to increase her screen time. The new dialogue worked really well and did not majorly interfere with our shoot time, meaning none of our actors were staying longer than what was necessary.
  • We also made sure to make a note of changes in lighting and try to avoid it as this would look more natural as we wouldn't have to excessively grade shots to match.


We all had a variety of jobs such as directing, filming and acting. We thought it was good to switch roles as it meant that no one got bored and that people could add some of their creative flair to the shots.


We were all very happy with how the shoot went and what we had achieved, which is shown through the fact that we didn’t need a backup shoot.

Construction Post 21: Our Production Kit

To keep organised and efficient we created a kit list, this was very useful. This kit list allowed us to the various pieces of kit that we would need in order to film our opening sequence. The kit list was very useful because our group needed quite a lot of extra equipment in order to pull off our shots. The equipment we used was:

Production Kit list


We also had to sign an equipment release so that the media department had an easy way to see which pieces of kit needed to be allocated to a specific group and to ensure everyone was up to speed with the process.


We also had to fill in the Home Shoot Organisation Form to ensure that we were organised when filming outside of school, we could easily see when we were shooting and at what time, this allowed us to avoid any confusion that could have arose with poor scheduling and time management.


Overall, the stages of preparation that we took were very useful as it ensured that there was no confusion within our group.