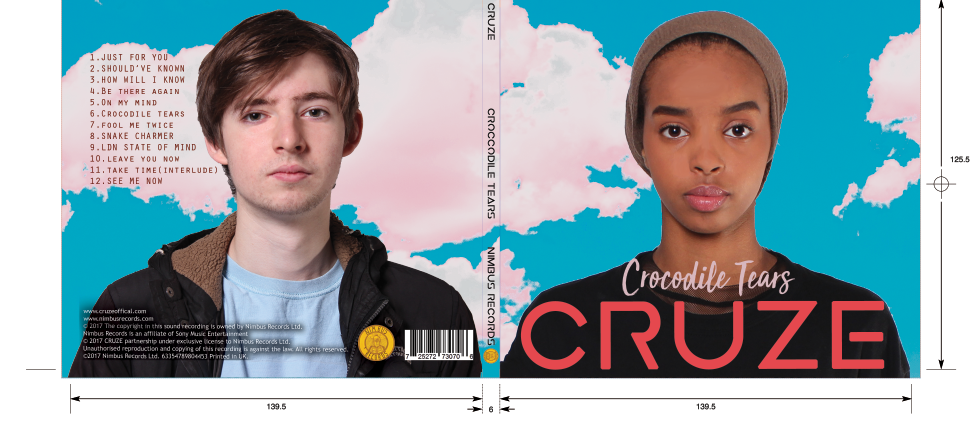
Complete the Digipak
With the other members of my group having less experience with Photoshop prior to this task, I took a lead role in the production of the Digipak. This included: sourcing the background image, recolouring the background image, cropping and spot healing the artists.
Overall I am extremely pleased with the final outcome of the Digipak and I feel we achieved what we set out to achieve.
What we wanted for our album cover:
What we wanted for our album cover:
- A creative and fun design to match the fun and care free genre of House/R&B
- Really clear mid shots of our do for the front and back panel
- Details: spine information, tracklist, record label, copyright information
Audience Feedback
The first step I took when constructing the digipak was deciding the two images we were going to use for our front and back cover as well as the background images. After choosing them we decided to show them to a small focus group to see what they thought about the images.
Here are the images:
Focus Group Response: They felt that due to the lack of symmetry in the neck line of the photo, despite how minor it may seem, it could draw attention away from the eyes.
The first step I took when constructing the digipak was deciding the two images we were going to use for our front and back cover as well as the background images. After choosing them we decided to show them to a small focus group to see what they thought about the images.
Here are the images:
 |
| Picture 1 - Front cover |
Teacher Response: They also agreed that we needed to change the picture as the wonky collar looked awkward.
My Response: I responded to the feedback by using a different picture of Aisha that had a symmetrical neckline.
Focus Group Response: They ought the picture was good but it would need spot healing and need to look brighter.
Focus Group Response: Our focus group all thought the background was good.
Teacher Response: They thought the background was good and agreed with our suggestion of possibly changing the colours to make it look unique.
My Response: I responded to the feedback by changing the colour of the clouds and also adding a few more clouds myself using the close stamp and lasso tool.
My Response: I responded to the feedback by using a different picture of Aisha that had a symmetrical neckline.
 |
| Picture 2 - Back cover |
Focus Group Response: They ought the picture was good but it would need spot healing and need to look brighter.
Teacher Response: They thought it looked fine, we would just need to use the spot healing tool.
My Response: I responded to the feedback by using the spot healing tool on ray and using the skin smoother to make his skin tone brighter.
My Response: I responded to the feedback by using the spot healing tool on ray and using the skin smoother to make his skin tone brighter.
 |
| Picture 3 - Background image |
Teacher Response: They thought the background was good and agreed with our suggestion of possibly changing the colours to make it look unique.
My Response: I responded to the feedback by changing the colour of the clouds and also adding a few more clouds myself using the close stamp and lasso tool.
Here is the finished product:
 |
| Album cover outside |
 |
| Album cover inside |


No comments:
Post a Comment