Below is our Music Video:


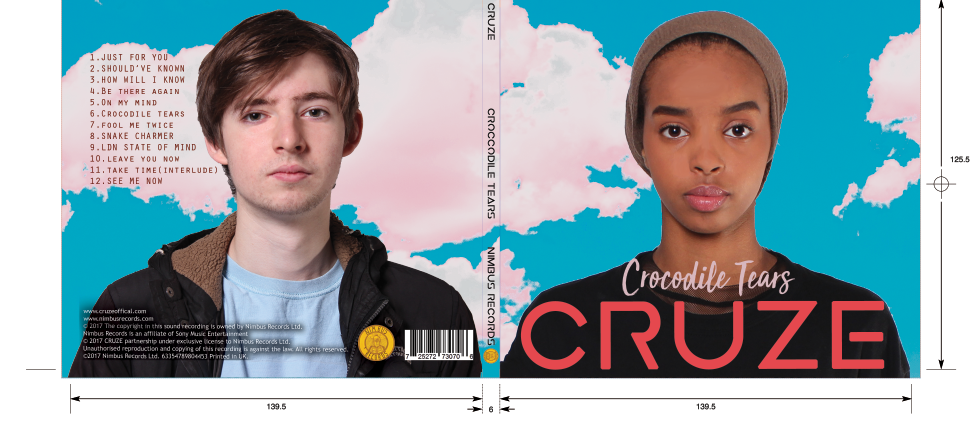
Below are the front panels of our digipak:

Below are the outside panels to our digipak.

Below are the outside panels to our digipak.

Below are the inside panels to our digipak.

Below are the inside panels to our digipak.

Click on the image below to access our website.

Thursday, 21 December 2017

Construction Post 6: Website Post-Production

What we had to do:

Create a fully functional website for our artists.

Overall I am very happy with the final outcome of the website. I think we achieved exactly what we set out to and I feel it looks very professional and realistic. The Wix software was very convenient as it allowed us to edit the website without any prior knowledge of html or other programming languages.

What we wanted for our website
  • Lots of interactive opportunities
  • An online store
  • Artist information
My contribution to the website
  • I set up some of the tour page.
  • Edited a lot of the record label contact page and artist information page (About Me)
  • I also helped to decide the content for the shop.
  • I also made the opportunites to interact with the artists in the form of the competions page
Audience Feedback

We to some members of our target audience to get their opinions of our website.
  • They loved the large focal images of the artists on the various pages.
  • They also liked the social media links, navigation bar and choice of pages. They felt everything felt very fluid and easily accessible similar to a real artist page. One thing they did say was that some of the links on some pages incorrectly redirected them. We fixed this by ensuring all links were working correctly.
  • They also felt that although the pages were nice they could be more interactive, for example the "Info" page. We remedied this by adding a more interactive Q&A with "hover-to-reveal" answers.
  • Teachers also said they liked the pages but we could use more brand links that would be suitable, we responded to this by adding a Beats tie-in competition, references to TV & radio appearances and a Nike collaboration.

Some of the problems we faced were:
  • When setting us social media links, due to some inactivity in the accounts. We got suspended from twitter which meant that none of our twitter links were working. We managed to get around this by creating a new account and making sure to satisfy twitters terms and conditions.
  • The content within the header was inconsistent on various pages meaning traversing the website was very disorientating. We were able to overcome this by creating one main header that we anted to run throughout the pages of the website and then making sure every page that was possible to visit was consistent with this ideal header.
Construction Post 5: Digipak Post-Production

What we had to do:

Complete the Digipak

With the other members of my group having less experience with Photoshop prior to this task, I took a lead role in the production of the Digipak. This included: sourcing the background image, recolouring the background image, cropping and spot healing the artists.

Overall I am extremely pleased with the final outcome of the Digipak and I feel we achieved what we set out to achieve.

What we wanted for our album cover:
  • A creative and fun design to match the fun and care free genre of House/R&B
  • Really clear mid shots of our do for the front and back panel
  • Details: spine information, tracklist, record label, copyright information
Audience Feedback

The first step I took when constructing the digipak was deciding the two images we were going to use for our front and back cover as well as the background images. After choosing them we decided to show them to a small focus group to see what they thought about the images.
Here are the images:

Picture 1 - Front cover
Focus Group Response: They felt that due to the lack of symmetry in the neck line of the photo, despite how minor it may seem, it could draw attention away from the eyes.

Teacher Response: They also agreed that we needed to change the picture as the wonky collar looked awkward.

My Response: I responded to the feedback by using a different picture of Aisha that had a symmetrical neckline.


Picture 2 - Back cover

Focus Group Response: They ought the picture was good but it would need spot healing and need to look brighter.

Teacher Response: They thought it looked fine, we would just need to use the spot healing tool.

My Response: I responded to the feedback by using the spot healing tool on ray and using the skin smoother to make his skin tone brighter.


Picture 3 - Background image
Focus Group Response: Our focus group all thought the background was good.

Teacher Response: They thought the background was good and agreed with our suggestion of possibly changing the colours to make it look unique.

My Response: I responded to the feedback by changing the colour of the clouds and also adding a few more clouds myself using the close stamp and lasso tool.


Here is the finished product:


Album cover outside
Album cover inside

Construction Post 4: Music Video Post-production

What we had to do:

Edit the video using Adobe Premiere Pro.

The menu we used
I have experience using Premiere Pro from previous years of media so I felt that I was at ease using the software and trying to create something professional looking. We used multi track editing to easily edit various parts of the video. We found the software very useful as we using a workspace setting that made it easy to accesses our rushes and to pick the video we wanted to edit into our music video. The procamp tool and other colour correction were very useful in allowing us to grade the video and achieve a very professional finish to our edited video, it also allowed us to create the aesthetic that usually acompaines this style of music video.

My contribution to the edit


  • I placed a lot of the clips and tried to gauge the general feel of the video.
  • I was able to go over some of the edits the other members of my groups made and tighten cuts and improve the overall feel.
  • I graded some of the video.
  • I added some effects such as the montage at the end and some of the 'ghosting' shots.
Here is an example of some of the shots that were graded. Before and after
A challenge we faced was our video being too repetitive at times. We showed an early cut of our video to our target audience and were told it was good but repetitive and this in turn drew away from some of the postive factors of the video but we overcame this by replacing shots and trying to change the pace of the video as it progressed.

Here I am editing the video
Reflection on Audience Feedback

Overall, we received extremely positive feedback. The fan favourites included the peach coloured handheld shots and the siren beauty shots. I'm pleased with these as I worked the camera in both of these shots and set the colour for the background. People didn't have many criticisms but some thought that maybe the DJ should have been limited to just the studio shots as they felt it looked slightly awkward in the shots on location. This did not come as a surprise as we had already decided to cut some shots as they looked unnatural or forced.

We also recieved feedback from our teachers who felt that some of our extras looked unnatural and awkward, this in turn would detract from the rest of the video. We managed to remedy this by getting rid of the footage that seemed far too unnatural, we recorded the song the whole way from from all the different camera angles and setups that we had so we had a plethora of footage to replace this with.

Here is the finished product:


Construction Post 3: Week 3 Production

What did we need to do

Complete the studio portion of the music video.

The different setups we needed to do were:


A setup with alternating blue and red lights inspired by the music video for 'Tyrant' for Kali Uchi


A setup with a projector, projecting images and videos of kaleidoscopes and optical illusions. This was inspired by the video for 'We Found Love' by 'Rihanna'


A setup on a sofa with varying numbers of people on it inspired by the video for 'Stay The Night' by 'Zedd'.


A setup with the DJ deck and a stool which functioned as the main performance shot. This was inspired by various videos such as the XXL Freshmen Freestyle.

Reflections

Overall I think the studio shoot was very successful. We got all of the shots we needed and a wide range of extra cutaway shots and we also did it in a very speedy amount of time leaving us with a lot of extra time to spend trying out trickier shots and attempting to make them perfect.

I got to use the Canon 5D a lot more than I have in the past and as a result have become much more competent with the equipment than I used to be. I also have gained more knowledge concerning the sound and lighting desks.

We did run into some issues such as the lighting on some shots not being bright enough so they needed to be re shot and some shots dipping in and out of focus. We were able to resolve these by doing reshoots and effectively evaluating what we had shot and making sure that it was good enough. The vast amounts of extra time we had proved useful as it allowed us time to do this.

My contributions to the shoot:

  • I did most of the camera work in the video.
  • I made a brief cameo in some of the shoots
  • I provided costume for the video.
  • I directed the actors.

Construction Post 2: Week 2 Production


What did we have to do:

1. Complete the 2nd location shoot
2. Complete the 2nd photoshoot

WOOD GREEN LOCATION SHOOT 

In production week 2 we had our second location shoot on a car park in Wood Green. The shoot was quite successful, we managed to get some of the shots we intended but there were many obstacles we had to overcome. These issues were:

  • The  camera battery was not completely charged when we set off so it was a rush to try and get the shots we wanted before the battery ran out.
  • As it took longer than expected to leave school and get to the location, it was very dark when we got to the car park and so lighting was an issue. However the night setting complimented the overall aesthetic of the video and we were resourceful with the lighting and got some good shots.
  • There were some members on the public that were curious in what we were filming and so watched us a lot, this put off some of our actors at first but they were able to get into role when these people left.


My contribution to the video shoot
  • I directed and filmed almost all of the shots as I was not in these location shots.
  • I helped to arrange some of the extras, this included making sure they knew what to wear and where to be at what time.
  • I provided some of the costumes for the shoot.

Digipak Photoshoot

The shoot was very successful as we were able to get a wide range of photos for our Digipak. To keep some continuity with our artists' image we shot this in Brick Lane as well. We were well equipped for the shoot with a tripod and DSLR camera.

It was a great shoot and the only major we faced was obstructions in the shot, this was often in the form of cars driving along the street that was between our camera and the subjects of the shots. This is exhibited in the shot below:


This just meant that we had to be patient and smart in order to make the most out of the time we had and to get a wide range of shot types that we wanted. We also decided to take photos in other locations were this wasn't a big issue.

My contribution to the photoshoot
  • I took all of the photos
  • I helped pick some of the costume.
  • I directed the actors
  • I also brought in my DSLR as a back up.

Construction Post 1: Week 1 Production

What did we have to do:

1. Complete of the first location shoot
2. Complete of the 1st photoshoot for our website

Brick Lane Location Shoot Overview

Our first production week was very successful. As we were shooting on location, we had to consider many factors such as weather, health and safety. We managed to get all of the shots we needed and were very impressed with all the variations of shots we needed to get. We managed to avoid any major issues due to our careful preparation and it was a very great day.

Here is a picture of the location that we shot in:


Reflection

In reflection it is clear that there were 2 main problems that we faced in Week 1 of Production. These problems are:

The characterisation of the extras was not fully complete
  • Before filming we had a brief conversation with the actors concerning the actors they had to play, this character was often carefree and fun. A more in depth explanation of the character would have been more useful as it would have made it easier for the actors to get into character and avoid having to re-shoot our shots as our actors were not able to adhere to their roles and ended up laughing or getting out of character in these shots. This meant that we had to constantly take multiple clips of the same shot as many mistakes were made. To overcome this solution, I would give out instructions whilst the camera was rolling telling each individual what to do so that it looked more natural, authentic and professional. We also gave our extras 3 moves that they use if they felt as though they had nothing else to do, this helped to keep up the atmosphere that we were trying to cultivate proving to be a useful technique.
Getting our extras to Brick Lane
  • We intended 5 extras to come in but in the end only 4 could make it. This meant we needed to be resourceful and work out our shots with one less person. We did not let this ruin our day and we pressed on and created the illusion of a large group by having everyone close together.